BUILD A FLOAT
It is wise to begin planning several months before the day of the parade. Look for creative and imaginative people to form a small committee of four to six members. Appoint a chairperson who is a good leader or organizer. When you begin building you will need to know tradespeople with backgrounds in carpentry, painting, and decorating.

DISCUSS YOUR IDEAS
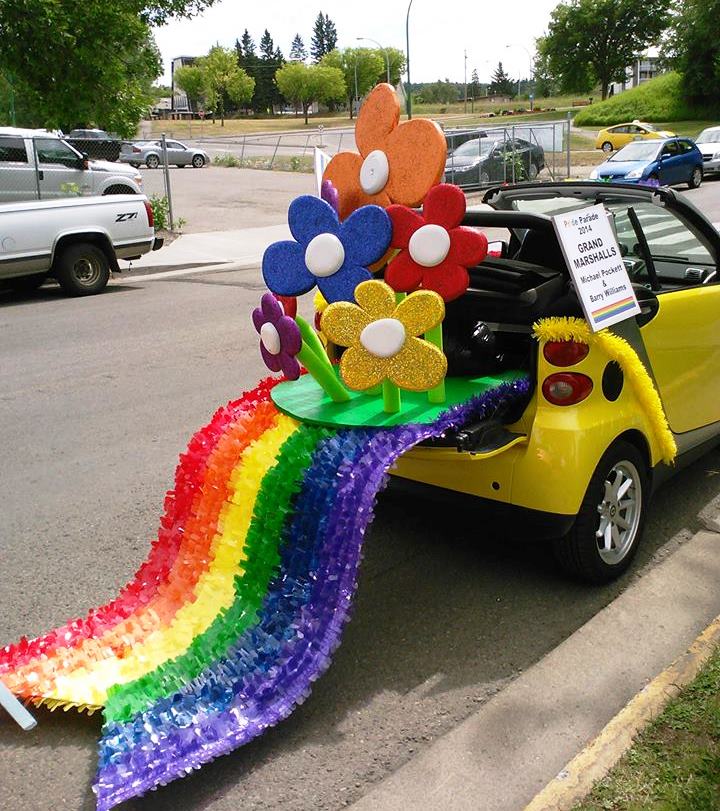
Have a meeting to discuss ideas: What do you want your float to be about? Is there a prevailing theme? A Jubilee or Anniversary? A homecoming? What about a Mascot? Remember, when designing the float, not to overcrowd it. Select a feature item and two or three complementary items. Your message should be conveyed simply yet powerfully. The sales pitch must be subtle, with the float leaving both an enchanting memory and a positive message with the crowd.
Select one main color and one or two contrasting colors for the float. Use white trim to separate dark colors. Animals and other props should not be threatening. Keep it simple. Select a place for the organization’s name and place it high and unobstructed on the float in large letters. You want your float to be colorful, eye-catching, and get the attention of the captive audience -including the thousands along the parade route as well as the millions reached by the media. Music from the float will draw attention before it appears and after it has moved on.
What does a float cost?
The most frequently asked question is HOW MUCH? The cost may vary from a few hundred to several thousand dollars. On commercially built floats, the labour is the most expensive item. For the do-it-yourselfer, the decorations may be the most expensive. Decorations for a float kit start at $700.00 or $800.00. Add a backdrop and the price goes to $1,400.00 or $1,500.00. You will also have to borrow, buy, or rent a flatbed trailer and buy lumber and plywood for it. Fundraising is a great way to cover the costs. This is best done months in advance through raffles, silent auctions, donations, social evenings, commercial sponsors, etc.
Once you have decided upon an idea, have an artistic person make a drawing for you. You can refer to the drawing while building your float. This alleviates a lot of headaches as you go along.
Organize your materials
It is now time to gather up the materials:
- Trailer and Tow Vehicle – The tow vehicle should not detract from the float. It should be as small as possible and decorated. A borrowed trailer will dictate the size and shape of your float, however, they are usually available for short periods only. If you buy your own trailer, you can use the float year after year, just sprucing it up or changing the design every few years. There are also collapsible travelling float kits that store easily and can parade from town to town.
- A Place to Work – A hangar, barn, or warehouse is ideal. Also arrange to have a place to store the float after the parade. If it is sheltered from the elements, this will minimize future reconstruction costs.
- Plywood and Lumber – Rough ply sheeting or used plywood and lumber can suffice.
- Tools – Skill-saw, jig-saws, hammers and nails, scissors, staple gun, and staples (1/2″ for coroplast signs, 3/8″ for twist, 1/4″ for floral sheeting), felt markers, pencils and measuring tapes.
- Decorations – Floral sheeting, vinyl twist, fringe, astroturf, etc. See our Decorations Page for ideas.
- Detailed Plan of Action – Allow yourself anywhere from one to eight weeks before the parade to assemble your float. A float that is very elaborate will obviously require more time to assemble.

construction
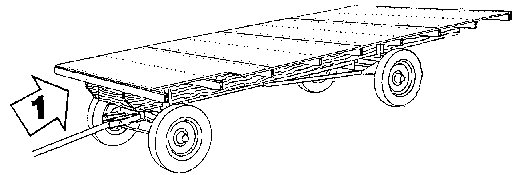
Step 1:
A parade float begins with a basic 4-wheel chassis flatbed trailer. Trailers of this type are normally seven to eight feet wide and fourteen to twenty-four feet in length. A hay wagon works fine. A smaller type of trailer such as a snowmobile or utility trailer, four feet wide by eight feet long is suitable for smaller organizations. If the surface of the flatbed is not level or has holes in it, you may wish to cover the top with sheets of plywood to provide a sturdy and smooth construction surface.
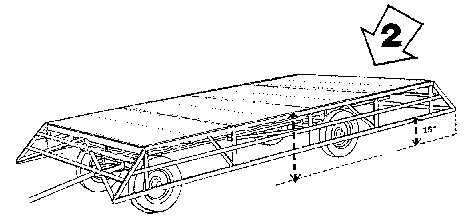
Step 2:
The width of the apron which goes around the trailer platform is determined by measuring the distance from the trailer bed to the ground. You will deduct fifteen inches for the fringe drop and the remaining measurement is the width of the apron framework. The apron can be made of plywood also and nailed to the trailer bed or hinges applied for a fold-up version. Sometimes the apron is extended for elaborate rounded shapes that make the float wider.
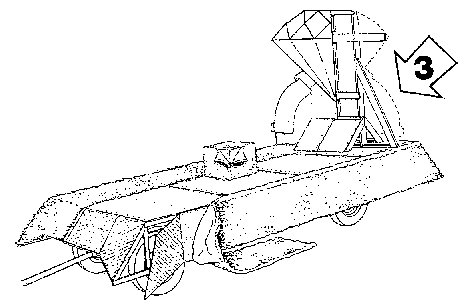
Step 3:
Once the apron is completed, the next step is to construct the components above the platform known as the superstructures. The decks, background supports, seating platforms and major props are put into place and secured to the flatbed. Remember to keep the superstructures simple and well-placed. Floral sheeting, signs, and trim will add more detail.
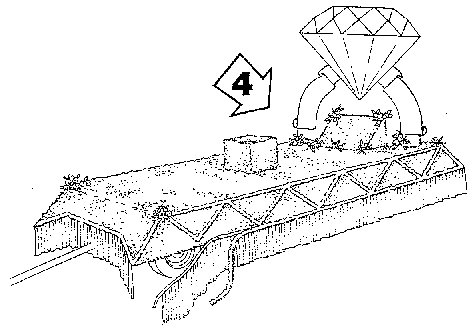
Step 4:
The final step is decorating and the range of materials can be as endless as your imagination. Vinyl floral sheeting is often used to cover the float. It is sold by the square yard and comes in standard or metallic colours. Next, a vinyl twist is added along the edges, around a sign or where two colours meet. ALWAYS DECORATE FROM THE TOP DOWN. Last of all, the fringe and twist are stapled to the bottom of the apron to conceal the wheels and to give a floating appearance.
Take pictures and have fun!
At Astro, we are equipped to provide you with complete parade float service from designing, constructing, and renting to storing or transporting a float to any desired location. If you wish to build your own float, we can supply you with all of the decorating materials as well as consultation. Once you understand the construction you can build a float that you, your committee, volunteers, and your community can be proud of.